12 Feb 2015
This is a follow up to my previous post on Ember Simple Auth where we looked at how to stay on the current page after authenticating. In this post we will look at a related scenario - How to stay on the current page after logging out.
This post describes how you can support the following situation in your app:
- You have a page in your application that is different depending on whether a user is authenticated or not.
- The unauthenticated version is publicly accessible.
- The authenticated version provides additional functionality specific to the current user.
- You want to keep the user on the current page after logging out.
invalidateSession Conventions
By default, when a user logs out (triggering the invalidateSession action), Ember Simple Auth reloads the application by redirecting the user to application's root URL. If the root URL requires authentication, they will then be sent to the login page. This behavior is defined in the sessionInvalidationSucceeded action mixed into your application route.
If you look at the source for that method, you can see that it sends you to the application's root URL:
sessionInvalidationSucceeded: function() {
  if (!Ember.testing) {
    window.location.replace(Configuration.applicationRootUrl);
  }
},
In this situation we may have a log out button on the page that invalidates the session. If we use Ember Simple Auth's default behavior, when the user logs out they will be redirected to the login page, but not brought back to this page after logging back in.
We want the user to log out and stay on the page they were previously on.
It turns out Ember Simple Auth provides a way around the default behavior by overriding the sessionInvalidationSucceeded action in our application route:
app/routes/application.js
import Ember from 'ember';
import ApplicationRouteMixin from 'simple-auth/mixins/application-route-mixin';

export default Ember.Route.extend(ApplicationRouteMixin, {
  actions: {
    sessionInvalidationSucceeded: function(){
      var currentRoute = this.controllerFor('application').get('currentRouteName');

      if (currentRoute === 'stay-on-this-route') {
        window.location.reload();
      } else {
        this._super();
      }
    }
  }
}
In our action, we are getting the name of the current route from the application controller and using that to determine what should happen next. If the user is on the route 'stay-on-this-route', they will not be redirected to the root URL, and instead stay on the current page*. If they are not on that route, we call this._super() and defer to the default behavior.
*Thanks to Gabor Babicz for pointing out that we can use window.location.reload() to clear out the in-memory data after logging out. Without this, the Ember Data records would stay in memory until closing the window or logging into another account.
Conclusion
You're probably asking yourself why anyone would want to do this. It's certainly an edge case, but in the app I've been working on, we have a use case for it - Users who share a computer, but have separate accounts. We want to provide them with a seamless UX if they are logged into the wrong account.
This same app also takes advantage of overriding sessionInvalidationSucceeded when a user deletes their account. Rather than redirecting them to the login form, we direct them to an "account deletion" route where they can provide feedback about why they closed their account.
That's all for now, but be on the lookout for more posts on hacking with Ember Simple Auth. Thanks for reading!
Shameless plug... If you're interested in working with awesome developers using Ember.js, come join us at Agilion!
11 Feb 2015
This is the first of a short series of Ember.js authentication recipes using Ember Simple Auth.
I've been using Ember Simple Auth for authentication in my Ember apps for close to a year now. I love it because it is easy to setup, and is extensible beyond its out-of-the-box capabilities.
As with other frameworks or libraries that follow the "convention over configuration" philosophy, doing things the expected way is easy, but doing things otherwise can sometimes be a pain. They usually allow you to do what you're trying to do, but it's not always obvious what the best or easiest way is.
The Problem
This post describes how you can support the following situation in your app:
- You have a page in your application that is different depending on whether a user is authenticated or not.
- The unauthenticated version is publicly accessible.
- The authenticated version provides additional functionality specific to the current user.
- You want to allow the user to stay on the current page after logging in.
Login Route Conventions
With the routeAfterAuthentication option, Ember Simple Auth lets you define a single route that the user transitions to after logging in:
app/initializers/my-custom-auth.js
export default {
  name: 'authentication',
  before: 'simple-auth',

  initialize: function(container) {
    config['simple-auth'] = {
      routeAfterAuthentication: 'my-default-route'
    };
  }
};
Any time a user logs into the app, they will be sent to whatever route is specified by routeAfterAuthentication - in this case it's 'my-default-route'.
One exception to this default behavior is when a logged out user tries to access a page that requires authentication. The user is transitioned to the login page, and when they log in, they're automatically brought back to the page they were trying to access.
What about pages that don't require authentication, but instead have a logged out version that differs slightly from the logged in version?
In this situation we may have a link that takes the user to the login page, or maybe even embed the login form directly in the page. If we use Ember Simple Auth's default behavior, when the user logs in, they will be brought to whatever route is defined by routeAfterAuthentication. This is not the behavior what we want.
We want the user to log in and see the authenticated version of the page they were previously on.
Defying Conventions
Ember Simple Auth does provide a way around this, but it's not very obvious from the documentation. When logging in, the method sessionAuthenticationSucceeded is invoked. This method is included with the ApplicationRouteMixin which should be mixed into your app's Application route.
If you look at the source for that method, you can see that before it goes to the default route, it first tries to take the user to the last attempted transition:
sessionAuthenticationSucceeded: function() {
  var attemptedTransition = this.get(Configuration.sessionPropertyName).get('attemptedTransition');
  if (attemptedTransition) {
    attemptedTransition.retry(); // <== would you look at that!
    this.get(Configuration.sessionPropertyName).set('attemptedTransition', null);
  } else {
    this.transitionTo(Configuration.routeAfterAuthentication);
  }
},
This is how it takes the user back to a page that required authentication once the user logs in, and we can use this behavior to our advantage.
When a route is entered and the beforeModel hook is called, a transition object for the current route is passed in. We can capture this transition and set it on the session and trick Ember Simple Auth into using it the next time the user logs in.
In our route:
export default Ember.Route.extend({
  beforeModel: function(transition) {
    if (!this.get('session.isAuthenticated')) {
      this.set('session.attemptedTransition', transition);
    }
  }
});
If we use this logic on a page where we want the user to come back after logging in, it will work exactly like we'd expect. The transition will be retried when sessionAuthenticationSucceeded is called, and send the user back to the page they were previously on.
Conclusion
Conventions are awesome because they make the easy things simple and let developers focus on creating value. One sign of a great library is when you can bend the rules a bit without writing lots of unmaintainable hacks that break every time the library is upgraded. Ember Simple Auth is one of these libraries.
We've looked at a simple example of bending the rules here to create a better experience for the user. To compliment this post, next time we'll look at how to stay on the current page after logging out.
22 Jan 2015
The Problem with Date Pickers
I have mixed feelings about date pickers. On one hand they look nice, but depending on the use case, the experience can be less than ideal.
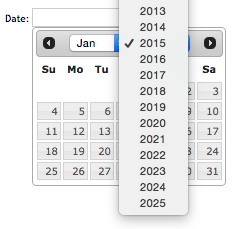
They are perfect if you need to see the date in the context of the surrounding days, such as when renting a hotel room or buying airline tickets. However, like a wall calendar, they are not optimized for viewing or selecting dates outside the current month. They typically default to today's date and choosing anything else becomes a game of "how many clicks does it take?".
A few of us at Agilion are building an Ember.js web application for a customer which allows parents to privately share their kids' photos, videos, and more with family and close friends. One of the first experiences users have with the app is an onboarding process where they enter information about their kids.
We recently ran into a UX issue where the date picker for selecting a kid's date of birth was a calendar, and we wanted something that was easier to use. In the case of a birth date, the surrounding context does not matter, so we were not limited to using a calendar-style date picker.
When someone asks for your date of birth, how do you say it? If you're like me, you say the month number, followed by the day, followed by the year. I don't picture a digital wall calendar where I have to select the year, then select the month and finally the day.
Wouldn't it be nice if we could enter dates in a more natural way? It turns out we can!
Hello Input Masks
An input mask solves this UX problem by natually guiding users as they enter a value or set of values into a form field.
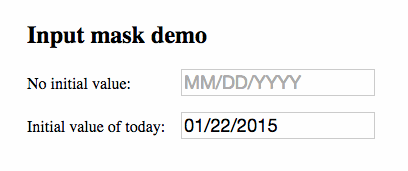
For this project, we chose jquery.inputmask for its flexibility and extensive documentation. Out of the box it supports dates, currency, phone numbers, email addresses, and many others.
Building an Ember.js Input Mask Component
To create a form input field as demonstrated above, we'll need to do the following:
- Install jquery.inputmask and Moment.js
- Create an input-mask component
- Insert the component into our template
The source of the demo app shown above can be found here. Note that this demo was built with ember-cli 0.1.2, but should be compatible with newer versions.
1. Installing the Dependencies
To get started, we'll need to import some dependencies. First lets install the latest version of jquery.inputmask using bower:
$ bower install jquery.inputmask --save
We'll also include Moment.js to handle date parsing and displaying:
$ bower install moment --save
Then we just need to import the two dependencies into our Brocfile:
Brocfile.js
app.import('bower_components/moment/moment.js');
app.import('bower_components/jquery.inputmask/dist/jquery.inputmask.bundle.js');
2. Creating the Component
Then we need to generate a component called input-mask:
$ ember g component input-mask
Inside the component, we'll initialize the input mask on the component's
DOM element. Note that the component inherits from Ember.TextField.
This provides us with the default behavior of Ember's built-in text field.
app/components/input-mask.js
/* global moment */
import Ember from 'ember';

export default Ember.TextField.extend({
  initializeMask: function() {
    var mask = this.get('mask');

    this.$().inputmask(mask, {
      onBeforeMask: function(value) {
        if (mask === 'mm/dd/yyyy') {
          return moment(new Date(value)).format('L');
        }
      }
    });

    // The input mask changes the value of the input from the original to a
    // formatted version. We need to manually send that change back to the
    // controller.
    this.set('value', this.$().val());
  }.on('didInsertElement')
});
The last part - this.set('value', this.$().val()); - was added in our app to be compatible with ember-validations. It may not be required, but it's there if you need it.
3. Using the Component
In our template, we simply insert the component like so, providing the
'mask' and optional placeholder:
{{input-mask
  mask='mm/dd/yyyy'
  placeholder='MM/DD/YYYY'}}

{{input-mask
  value=bornOn
  mask='mm/dd/yyyy'
  placeholder='MM/DD/YYYY'}}
In both cases, we are passing a mask property of 'mm/dd/yyyy' to the component. This is one of the mask types provided out of the box. Since our value is coming in as a JavaScript date object, we need to transform the value before the mask can use it:
this.$().inputmask(mask, {
  onBeforeMask: function(value) {
    if (mask === 'mm/dd/yyyy') {
      return moment(new Date(value)).format('L');
    }
  }
});
Here we are converting the date object that is passed to a string using Moment's 'L' format. This converts the date to the string format that the input mask is expecting: 'mm/dd/yyyy'. It needs to happen in onBeforeMask because we have to preprocess the value before the mask is applied.
Conclusion
By introducing input masks into our forms, we have optimized for the majority case. It doesn't matter if your kid's birthday was yesterday or five years ago because the UX is the same for everyone.
This post has barely scratched the surface of what can be done with input masks. The documentation is thorough, albeit slightly intimidating. I'd recommend checking out the demo page for ideas on other ways to use it in your app.
Thanks for reading!
20 Jul 2014
This is an update to my previous post on Direct image uploads from the browser to the cloud with Ember.js and Cloudinary. A few days after writing that, Cloudinary announced support for unsigned image uploads. This post is intended to supplement my original tutorial and only includes the pieces that need to change from those examples. For comparison, here is everything that can be removed from the example Rails API and everything that needs to change in the Ember application.
Note: You will need cloudinary_js >= 1.0.17 for this feature. If you used my example ember-cli project, you will already have this version.
Signed vs Unsigned Uploads
A signed upload, as described in my original post, is an upload request to Cloudinary that sends an extra "authentication signature" parameter with the image data. This signature is created using your Cloudinary secret key, and for security reasons, requires a server-side API request to generate it. Signed uploads are tricky to work with because they require you to have total control over the server-side application, which may not be the case if you're just building a client-side application. They are also hard to troubleshoot because of the order that things must be done in the JavaScript.
On the other hand, unsigned uploads do not require an authenticated signature and are easier to get started with because you completely bypass your API server. The way unsigned uploads work is that they use an upload_preset generated in the Cloudinary management UI, rather than the API key and secret that we used previously. According to the Cloudinary docs, "not all upload parameters can be specified directly when performing unsigned upload calls", but it seems like most of the functionality you would want is still provided. The only feature I found disabled with unsigned uploads was the ability to overwrite existing images with the same public ID.
When you add a new preset in the Cloudinary UI, it will automatically generate a "Preset name". While you're in there, you also specify settings like tags, a folder, or even eager transformations so they don't have to be created on-the-fly. All you need to get up and running is the preset name - everything else can be left with the default settings. Note that preset settings will take precedence over any options sent with the image upload request.
Environment Settings
In an ember-cli project, environment specific settings are defined in config/environment.js. We'll add a setting for the preset in addition to the existing cloud name, and remove CLOUDINARY_KEY because it is no longer required.
// omitted ...

if (environment === 'development') {
  ENV.CLOUDINARY_NAME = 'dev_cloud';
  ENV.CLOUDINARY_UPLOAD_PRESET = 'abc123';
}

if (environment === 'production') {
  ENV.CLOUDINARY_NAME = 'production_cloud';
  ENV.CLOUDINARY_UPLOAD_PRESET = '123abc';
}

// omitted
Cloudinary Config Initializer
Since you no longer need to specify the api_key, that option can be removed from the initializer, leaving just the cloud name.
export default {
  name: 'cloudinary',

  initialize: function(/* container, app */) {
    $.cloudinary.config({
      cloud_name: CatsUiENV.CLOUDINARY_NAME
    });
  }
};
Changes to the View
The Ember view we introduced previously can be simplified because the app no longer needs to load the authentication signature from the server. We don't need to wrap the Cloudinary setup in a callback that uses Ember.run either, which felt a little hacky to me.
export default Ember.View.extend({
  tagName: 'input',
  name: 'file',
  classNames: ['cloudinary-fileupload'],
  attributeBindings: ['name', 'type'],
  type: 'file',

  didInsertElement: function() {
    var controller = this.get('controller');

    this.$().unsigned_cloudinary_upload(
      CatsUiENV.CLOUDINARY_UPLOAD_PRESET, {
        cloud_name: CatsUiENV.CLOUDINARY_NAME
      }, {
        disableImageResize: false,
        imageMaxWidth: 1000,
        imageMaxHeight: 1000,
        acceptFileTypes: /(\.|\/)(gif|jpe?g|png|bmp|ico)$/i,
        maxFileSize: 5000000 // 5MB
      }
    );

    this.$().bind('fileuploaddone', function (e, data) {
      controller.set('newCat.cloudinaryPublicId', data.result.public_id);
    });
  }
});
The entire view is included above, but I wanted to point out a few changes in this particular block of code:
this.$().unsigned_cloudinary_upload(
  CatsUiENV.CLOUDINARY_UPLOAD_PRESET, {
    cloud_name: CatsUiENV.CLOUDINARY_NAME
  }, {
    disableImageResize: false,
    imageMaxWidth: 1000,
    imageMaxHeight: 1000,
    acceptFileTypes: /(\.|\/)(gif|jpe?g|png|bmp|ico)$/i,
    maxFileSize: 5000000 // 5MB
  }
);
You'll notice above that we're now using unsigned_cloudinary_upload() which takes three arguments, as opposed to cloudinary_fileupload() from the previous post which only required one. The first argument is the name of the upload preset that you create in the Cloudinary settings UI. The second argument is the list of Cloudinary-specific upload parameters that are not defined by the preset. The last argument is the list of jQuery File Upload options that we specified in the original implementation.
One of the things that confused me was the fact that Cloudinary's tutorial passes the cloud_name option to the unsigned_cloudinary_upload() function. It seems redundant to specify the value in both places, but I tried removing the cloud name setting from the config initializer and got an "Uncaught Unknown cloud_name" error.
For the sake of demonstrating where Cloudinary recommends putting it, I am specifying cloud_name in both the initializer and the view, but this is not required. In otherwords, cloud_name does not need to be passed to unsigned_cloudinary_upload(), but would still require an empty object literal to be passed as the second argument like so:
this.$().unsigned_cloudinary_upload(
  CatsUiENV.CLOUDINARY_UPLOAD_PRESET, {}, {
    disableImageResize: false,
    imageMaxWidth: 1000,
    imageMaxHeight: 1000,
    acceptFileTypes: /(\.|\/)(gif|jpe?g|png|bmp|ico)$/i,
    maxFileSize: 5000000 // 5MB
  }
);
Conclusion
Maybe I'm missing something obvious, but what prevents someone from copying your cloud name and preset name and using them to upload files from a different application? In an ember-cli application, the settings from config/environment.js are not obfuscated and can be easily viewed in the source of the generated index.html page. The only info I could find that sort of addresses the issue was a single sentence on the Cloudinary blog stating "Unsigned uploading makes this much simpler to use in modern apps, while security measures are taken to detect and prevent abuse attempts.". They don't state exactly what security measures they're taking, so I guess you'll have to take their word for it.
Assuming they have the security thing figured out, this is a much easier way to get started with direct image uploading to Cloudinary from an Ember.js app. There is no longer a dependency on the server to generate an authentication signature, which was arguably the most confusing aspect of setting this up.
13 Jul 2014
Update 07/20/2014: I've written an additional post on unsigned uploads that builds upon this article.
Uploading images to a web application has historically sucked. If you're in the Ruby on Rails world, there are a few gems like Paperclip and Carrierwave which are great attempts at solving this problem, but are about as fun to work with as a pile of rocks. I'm picking on these two in particular because they are the most popular Rails file upload gems, and every time I have to use one of these libraries, I get pissed off.
Some of the issues I have with these gems include:
- They try to cover every possible use case, making it difficult to
figure out what code you actually need.
- The DSLs are designed with nearly infinite flexibility, making them hard
to learn and remember.
- They require storing image meta data in the database and it's hard to remember which columns are required.
- You're forced to manually run a server-side process if you decide you want to resize the images after they've already been uploaded.
- They're not opinionated enough and we end up with a slightly different implementation each time.
The last point is the main reason I'm writing this post. I like opinions and hate thinking about something boring after I've done it once. This is why I use Ember.js, Rails, OS X, a car with automatic transmission, and the popcorn setting on my microwave. I also don't set the clock on my microwave, but that has nothing to do with this blog post.
Re-evaluating Our Needs
When Agilion started working on a new customer project last month, I was less than thrilled to find out that we'd need to support image uploads. This was our first Ember.js project that required image uploads, so after a short discussion among our team, we wanted to try something different.
We decided to use Cloudinary with direct image uploads to see if it made our lives any easier. The idea behind it is that the images go directly to the cloud storage host, and never pass through your server. If you've ever used Stripe for credit card processing, it's basically the same concept but for images. None of us had ever done this before, but the prospect of not dealing with storage, resizing images, and complicated documentation sounded too good to be true.
Our main goal for trying this approach was to reduce the development effort to support image uploading. Since all of our new projects are in Ember.js, we wanted to find a solution that would work well for this framework. As contract developers, we try to reduce our implementation time to keep costs down for our customers, and this seemed like a great opportunity to do that.
Background Information and a Demo
After doing some research on direct image uploads, we learned that the basic flow works like this:
- User visits page and clicks file upload button
- User selects one or more images
- Images are sent directly to Cloudinary from the browser
- Cloudinary sends back meta data for each image one at a time, including the "public id" (later used to retrieve images)
- Browser makes API request to the server to create a new record for each image, and includes the Cloudinary "public id" in the request
- The image is fetched from Cloudinary on demand by constructing an image URL using the public ID.
Rather than including a bunch of client-specific code that would not be fully functional, I created a simple Ember application that is backed by a Rails API. They are in separate repos because that is how we develop Ember apps at Agilion.
At the time of writing, the demo is using:
Required Pieces of the Application
Client-side (Ember)
- Initializer with Cloudinary configuration settings
- Cat Model
- Cats Controller
- Cloudinary File Input View
- Cats Template
- Cloudinary Image Tag Helper
Server-side (Rails)
- API endpoint to generate authentication signature
- API endpoint to persist a record
I've only included the most important pieces of the Ember code to reduce the length of this post. Things like the router and Cats route are omitted but can be found in the example app. I've also left out the server-side code we use to generate the authentication signature because I want this to be a server-agnostic tutorial.
Cloudinary Config Initializer
The initializer is simply telling the Cloudinary plugin what the cloud name and public key are for this application. In an Ember-CLI project, these values are stored in the environment-specific configuration. Note that there is a private key, but this is not set in the Ember app. The private key is used when creating an authentication signature (see "Authentication Signature" section) and is only included in the Rails app settings.
app/initializers/cloudinary.js - GitHub
export default {
  name: 'cloudinary',

  initialize: function(/* container, app */) {
    $.cloudinary.config({
      cloud_name: CatsUiENV.CLOUDINARY_NAME,
      api_key:    CatsUiENV.CLOUDINARY_KEY
    });
  }
};
Cat Model
The Cat model is pretty straightforward. We have a property for the name
of the cat, and a property for the Cloudinary Public ID. Both of these
attributes correspond to database columns on the Cat model in the Rails application. Note that both are required in the demo.
app/models/cat.js - GitHub
export default DS.Model.extend({
  name:               DS.attr('string'),
  cloudinaryPublicId: DS.attr('string')
});
The Cats Template
In the demo, the Cats template is used as both an index page to list all of the cats, as well as the location of the new cat form. I have only
included the form portion here.
app/templates/cats.hbs - GitHub
<form role="form" {{action 'createCat' on='submit'}}>
  <div class="form-group">
    <label for="cat-name">Cat Name</label>
    {{input value=newCat.name class="form-control" id="cat-name" placeholder='Cat Name'}}
  </div>
  <div class="form-group">
    <label for="cat-image">File input</label>
    {{view 'cloudinary'}}
  </div>
  <button type="submit" class="btn btn-default">Submit</button>
</form>
In the code above, you can see that we are rendering the file input tag using an Ember view called 'cloudinary'.
The Cloudinary View
The Cloudinary file input view has a few responsibilities related to setup and configuration of the Cloudinary widget. Here is the entire view in one piece, but it is broken down and explained in detail further down:
app/views/cloudinary.js - GitHub
export default Ember.View.extend({
  tagName: 'input',
  name: 'file',
  attributeBindings: ['name', 'type', 'data-form-data'],
  type: 'file',

  didInsertElement: function() {
    var _this = this,
      controller = this.get('controller');

    $.get(CatsUiENV.API_NAMESPACE + '/cloudinary_params', {timestamp: Date.now() / 1000}).done(function(response) {
      // Need to ensure that the input attribute is updated before initializing Cloudinary
      Ember.run(function() {
        _this.set('data-form-data', JSON.stringify(response));
      });

      _this.$().cloudinary_fileupload({
        disableImageResize: false,
        imageMaxWidth: 1000,
        imageMaxHeight: 1000,
        acceptFileTypes: /(\.|\/)(gif|jpe?g|png|bmp|ico)$/i,
        maxFileSize: 5000000 // 5MB
      });

      _this.$().bind('fileuploaddone', function (e, data) {
        controller.set('newCat.cloudinaryPublicId', data.result.public_id);
      });
    });
  }
});
First, it is responsible for loading the authentication signature from the Rails API:
$.get(CatsUiENV.API_NAMESPACE + '/cloudinary_params', {timestamp: Date.now() / 1000}).done(function(response) {
  Ember.run(function() {
    _this.set('data-form-data', JSON.stringify(response));
  });

  // ...
It appends the returned signature object to a data attribute on the file input HTML element called "data-form-data". Note that this is done within an Ember.run function to ensure that it is finished before initializing up the Cloudinary file upload. This was something that stumped us at first, and I'm sure there's a better approach.
After the signature data is set, the view initializes the Cloudinary file upload widget on the input. Here is where we define the settings for our project such as the maximum file size allowed, accepted file types (images) and the maximum dimensions of the image (it automatically scales them down). Additional options can be found in the jQuery File Upload documentation.
_this.$().cloudinary_fileupload({
  disableImageResize: false,
  imageMaxWidth: 1000,
  imageMaxHeight: 1000,
  acceptFileTypes: /(\.|\/)(gif|jpe?g|png|bmp|ico)$/i,
  maxFileSize: 5000000 // 5MB
});
The last functionality this view is responsible for is handling the Cloudinary response and setting a cat model's Cloudinary public ID. Cloudinary sends various events to the input including progress and completion, to which you can bind functionality. In the demo, we're just binding to the 'fileuploaddone' event and setting a controller property when it's complete. Additional callback options can be found in the jQuery File Upload documentation.
_this.$().bind('fileuploaddone', function (e, data) {
  controller.set('newCat.cloudinaryPublicId', data.result.public_id);
});
The Cats Controller
In the demo, the cats controller is a simplified version of what you would use in a production application. By this point, the view has already set the public ID for the cat's image, and we are just persisting the cat with ember-data and then creating a new Cat record so the form has a different object.
export default Ember.ArrayController.extend({
  // omitted ...

  actions: {
    createCat: function() {
      var _this = this;

      this.get('newCat').save().then(function() {
        _this.set('newCat', _this.store.createRecord('cat'));
      });
    }
  }
});
Authentication Signature
Another thing that tripped us up was the process for authenticating the Cloudinary image upload request. Cloudinary requires that you generate an authentication signature on the server and pass it to the client before initializing the file upload widget. It wasn't clear from the documentation why this needed to be done or what was actually required to do it.
The authentication signature is a property that is sent to Cloudinary with the images, and is used to authenticate your request. It seemed counter-intuitive at first that we were depending on the Rails API for something that was supposedly 100% client-side. From a security standpoint, it makes perfect sense because the private key would not be private if it was included in the JavaScript source code.
When the page loads, our application makes a request to the server (via the Cats view) that generates an authentication signature. I've omitted the controller code to generate the JSON, but the request will look something like this:
http://localhost:3000/v1/cloudinary_params?timestamp=1405265520.34
That request returns a response that looks like this:
{
  "timestamp":1405265520,
  "signature":"4a49f7e9009924b0d811e9bdc8798ca19cdb2da4",
  "api_key":"123456789012345"
}
Note that the API key is the same public key that is also set in the
Cloudinary initializer above.
As described in the Cats view section, this entire signature object is appended to a data attribute on the file input field, and the Cloudinary upload widget automatically sends it with the image data when a user selects an image.
Viewing the images
Another frustrating thing about the Cloudinary documentation is that everything we needed for this project was scattered among at least three different sources. After we had image uploads working, the docs we were referencing assumed we would be using our server-side framework (Rails) to render our HTML templates. Since Ember uses Handlebars and the templates are rendered 100% client-side, we needed a different solution.
In order to view images that are stored in Cloudinary, you need to construct a custom URL that includes the image's public ID, and any options such as image size and scale. We ended up creating a helper to handle this functionality, but in retrospect, a component may have been a more semantic option for us. Additional options for constructing the URL can be found in the jQuery image manipulation documentation.
app/helpers/cloudinary-tag.js - GitHub
export default Ember.Handlebars.makeBoundHelper(function(publicId, options) {
  if (Em.isBlank(publicId)) { return ''; }

  var height = options.hash.height || 535,
    width = options.hash.width || 535,
    crop = options.hash.crop || 'fill',
    cssClass = options.hash.class || 'cloudinary-image';

  return new Ember.Handlebars.SafeString($.cloudinary.image(publicId, {
    width: width,
    height: height,
    crop: crop,
    class: cssClass
  }).prop('outerHTML'));
});
Again, I've omitted the less relevant template code and only left in what is required to render the HTML image tag:
app/templates/cats.hbs - GitHub
{{#each persistedCats}}
  <div class="col-lg-6">
    <div class="thumbnail">
      {{cloudinary-tag cloudinaryPublicId}}
      <div class="caption">
        <h3>{{name}}</h3>
      </div>
    </div>
  </div>
{{/each}}
Conclusion
While not necessarily specific to this approach, the biggest downside I can see is that you're locking yourself into a single vendor. The pricing is reasonable for smallish applications that are just getting off the ground, but if you expect your users to upload thousands of large images, you'll quickly find yourself in Cloudinary's "Enterprise/Custom Plan" (which I suspect is significantly more expensive than straight up Amazon S3). During testing, we started on the free plan which includes 500MB of total storage and 1GB of monthly bandwidth. We ended up blowing through the 1GB of bandwidth in a couple days and had to upgrade to the $35/month "Basic" plan. In Cloudinary's defense, we were uploading large images during testing, which was not really necessary since we could have just been testing with much smaller file sizes.
Despite some initial frustration with the Cloudinary documentation, my overall impression is that this is the future of image and file uploading in JavaScript web applications. By not depending on the server to process image and file uploads, the API code is simpler and easier to maintain. Pushing this responsibility onto a cloud host like Cloudinary allows us to develop faster and focus on functionality that is relevant to our customers' applications.